


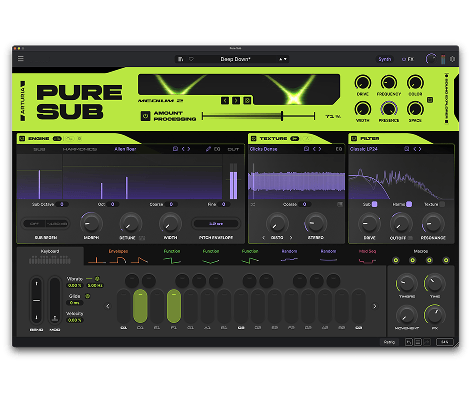
Pure SUB is a monophonic bass synthesizer built for modern bass design, where creative processing transforms simple waveforms into expressive, rich bass sounds.
By combining flexible synthesis with powerful processing, Pure SUB lets you build and transform bass sounds in a clear and intuitive way.
Make sure to refer to our dedicated FAQ articles to understand how to register, activate and install our software licences:
How to register a product
 Note
Note
If the software license was acquired on our Webstore, no manual registration should be required as the license should be automatically registered on your account once the order will be validated and confirmed. If everything went fine, you should normally receive specific "Order confirmation" and "Licenses registration" emails.
In order to start using Pure SUB as a Standalone application, you may have to adjust some settings:
- To do so:
-Click on the "Hamburger" menu and open "Audio MIDI Settings":
-Make sure to select your Audio Device (Preferably a dedicated Audio Interface for better performance/quality) and an appropriate Audio Driver (Windows only) such as "Windows Audio" "ASIO4ALL" or your dedicated "ASIO Driver".
-Check also that correct "Output Channels" are being selected:
macOS uses "CoreAudio" driver and this cannot be changed.
-Now, adjust the "Sample Rate" between 44100/48000/96000Hz and the "Buffer Size" between 64 and 512 samples depending on the performance of your computer and the latency you would like to reach.
-Click on the "Play" button to ensure that sound is working and forwarded to the desired output:
-Finally, tick the box in front of your MIDI Controller "MIDI" port (if you have any) and click on "OK":
Please note that if owning an Arturia Controller, the correct MIDI port should be automatically selected on software opening (of course, if the controller is not working immediately make sure to double check this option).
-Once done, using your MIDI Controller or the Virtual keyboard from the interface should generate sound via the selected output.
- While adjusting these setting keep in mind that:
-We do recommend avoiding Sample Rates over 96000Hz.
-The higher the Sample Rate the more the CPU consumption will be.
-Setting a too low buffer size (such as 64 and below) can lead to a significant increase in CPU consumption (but with almost no latency) and thus generate Audio Cracklings if the CPU cannot handle the load.
-Setting a too high buffer size (such as 512 and over) can lead to a significant increase in Latency while lowering the CPU consumption.
The goal here is to find the best compromise depending on your usage, needs and depending on the capability of your computer (44.1 or 48 Khz and 128-256 samples usually offers a correct balance between both).
Concrete example:
Lowering the buffer size can be useful while playing Live or during Recording while Increasing it can be useful while playing back a recorded project (where latency does not matter but CPU load does when working with multiple plugins / tracks).
Next Step
After testing Pure SUB as a Standalone application, you may want to start recording sounds and go further along with your instrument.
To do so, please refer to the following section explaining how to use it as a plug-in.
To start recording, you will need to use Pure SUB as a Plug-in and not as a Standalone application.
Please note that Pure SUB can be inserted as a plug-in in a dedicated DAW of your choice supporting any of the following formats:
- AAX (Pro Tools only)
- Audio Unit (mac only)
- VST2 & VST3 (most common format used by all the major DAWs or Hosts)
We though recommend using DAWs part of our Software Instruments compatibility list available here:
Virtual Instruments - Compatibility
-After opening your DAW, the first step will be to open its dedicated "Audio / MIDI Settings" menu to adjust the settings following the same rules as the ones described in the above "How to use Pure SUB as a Standalone application" section (make sure to refer to the DAW User Manual if needed).
-Once done, next step will be to insert Pure SUB as a plug-in on a MIDI or Instrument track:
You will find below some useful links to rescan your plug-ins (in case the plug-in would not be immediately identified) and insert your software instrument in your favorite DAW:
How to insert an instrument in my favorite DAW?
-Once inserted on a MIDI or Instrument track, you can typically start recording after enabling "Arm Record" on the track and after clicking on the DAW "Record" Transport button or on the "MIDI Clip" dedicated record button.
e.g with Ableton Live:
-Click on "Arm record" on the track where Pure SUB was inserted:
-Click on the MIDI clip "Record" button and play on your MIDI Controller to start recording:
-Now, you should see MIDI Notes being recorded inside the MIDI Clip, and using the "Play" Transport button should allow you to playback the previously recorded clip:
Make sure to refer to your DAW User manual or Knowledge Base if you are not familiar about how to insert, record as each of them may have their own methods.
You will find below a quick summary of the important sections and filtering/sorting options available in the Preset browser:
You can of course use the search if you are looking for a specific preset but other useful options are available, so let's describe them below:
- Filters: You can filter presets by Types / Styles / Banks and even filter "User" presets to easily find your own created presets.
- Sorting: You can sort presets by Liked presets (heart icon) / Name / Type / Designer or even Bank (after clicking on the small Hamburger icon aside of the Designer column).
- Sound Banks: Allows to easily access all of the already acquired and installed Sound Banks to use them.
- Favorites: You can use the heart icon in front of presets to add Favorites to this list and also right-click on presets to use the color tagging system to create specific presets lists.
- My Playlists: Allows to create or load Playlists to easily reload presets used in a specific Project/Song and even use MIDI Program Change messages (Sent from a MIDI Controller or a DAW) to recall them.
Adding texture that reacts to your sub using the Texture Engine.
You can use Ring Mod, Amp Mod or Distortion in the Texture Engine to make the noise source become modulated by the sub frequencies.
You can also turn on key tracking so the noise source follows the pitch:
Instantly transform your sound using the Sub Processor.
The Sub Processor contains a varied selection of pre-made effects chains designed for modern bass. Manually experiment with different modes and macro settings, or use the dice randomiser buttons to randomise the mode or the macro positions.
You can also modulate the wet/dry and macros for deeper sound design possibilities:
Add movement to your bass with the Function modulars
Draw your own shapes, or choose from the 6 categories of shape types.
The Movement category includes 58 shapes designed specifically for modern bass design:
Retain your low end using the Sub Regen
Sometimes your fundamental (sub) is affected by the effects processing, causing the low end to lose its power. Use Sub Regen to choose which stage of the processing the fundamental is recreated.
This is similar to direct out but instead, the fundamental is still sent through the chain and the Regen creates a new clean fundamental:
Create variations or a completely new sound using the randomising dice.
Dice symbols are available across the different engines as well as the FX Rack. Use these instantly create a variation of your sound or to design something completely new with ease.
Pure SUB offers a really useful In-App tutorial which explains a lot of features in details and which provides a good overview of all the different sections of the software so make sure to have a look at it in case such is not already the case.
You should be offered a Quick Tour on first opening:
In case you would have missed this opportunity, you can still access In-App tutorials via "Preferences" -> "Tutorials" menu:
Make sure to also refer to the latest User manual which provides in-depth information of the software:
Finally, you will find below some other useful links to rescan your plug-ins and insert your software instrument in your preferred DAW: