
In case of detection or communication issues with your device, please refer to the suggestions below to try to resolve the said issues:
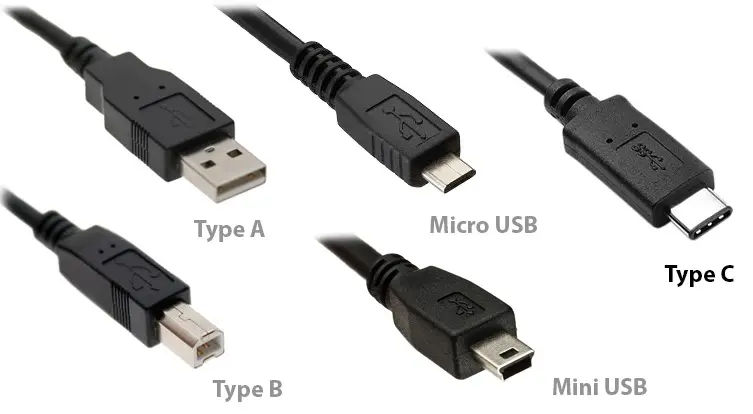
USB CABLES
Avoid:
- USB hubs
- USB cable extensions
- USB Adapters
Prefer:
- Powered USB hubs (if you absolutely need to use a USB hub) with a separate power adapter, or one supporting "Power Delivery" (if your computer is compatible)
- Cables with High Quality connectors
- Cables with a 5Gb transfer rate or higher, if you're using a USB 3.0 cable
 Good practice:
Make sure to try connecting your device with different USB cables (preferably a known-working one), as detection issues might originate from a faulty USB cable.
USB PORTS
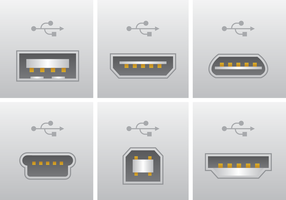
Try different kinds of USB ports than the one currently used:
- If using front panel USB ports on a desktop computer, make sure to try those located on the back panel as well.
- If your computer do have both USB 2.0 and USB 3.0 / 3.1 ports, make sure to try the different ones.
Good practice
Test your device on another computer to confirm if the issue seem specific to your current setup or not.
If these usual recommendations did not help, please refer to the following sections depending on your operating system or the device used:
-macOS requires to be careful about some specific access restrictions.
-Windows may require a dedicated driver to be properly installed depending on the device.
-Class Compliant Devices (Plug & Play) may require to check for the correct device detection on OS side.
Device Detection
- Privacy & Security:
First, make sure to check if the device was allowed on OS side as otherwise no connection with the device will be possible.
Normally you should be prompted to allow it on first device connection but for some reasons (related to this known issue) the pop-up may sometimes immediately vanish and prevent users to allow them for them to be authorized:
In case such would happen or in case you would have wrongly clicked on "Don't Allow", make sure to follow these steps:
1/ Open System Settings
2/ Click on Privacy & Security
3/ Scroll down and click the pop-up menu next to "Allow accessories to connect," then choose which option you want:
- Always Ask: Manually approve every accessory, every time
- Ask for New Accessories: Manually approve new accessories the first time they connect (default setting).
- Automatically Allow When Unlocked: Automatically approve accessories when they connect to your unlocked Mac.
- Always Allow: Automatically approve all accessories when they connect (Recommended option if you would like avoiding any troubles keeping in mind that such may lead to potential Security risks if multiple users can physically access your computer)

- MIDI Studio:
Check for your MacOS Midi Studio to confirm if the device is being displayed.
1/ Open Spotlight (CMD + Space) and type in "Audio MIDI Setup" ("Audio" is usually enough):
2/ Click on "Show MIDI Studio" button located in the top bar "Windows" menu:
2/ If the device is not displayed here or greyed out (once plugged in and powered up), try to create a “New configuration”:
3/ If this problem persists (and if the device is working fine on any other computer) performing an SMC and PRAM reset (If applicable to your mac model) may also be worth a try:
How to reset nvram / pram and smc on a mac
Device Communication
In some situations, the device may be detected properly on OS side but communication with applications may be blocked for or not working as expected depending on some specific OS or devices settings:
- Midi Controllers:
Make sure to refer to the following article to understand what could prevent MIDI devices to operate as expected depending on the situation:
Common MIDI issues - Troubleshoot
- Audio Interfaces:
macOS can prevent Audio Interfaces inputs to be usable with your DAW / Recording software, so make sure to check both suggestions below:
- Microphone Access:
You should find an important option via macOS "Privacy & Security" menu called "Microphone access", if not enabled and allowed for the desired application, no Audio signal coming from any Audio devices (USB microphones but also any USB Audio devices/interfaces) will be reaching your Audio Tracks preventing any recordings to be done:
1/ Open System Settings
2/ Click on Privacy & Security
3/ Enable the access for all applications you would like to retrieve signal to:
- Voice Isolation:
After enabling Microphone Access, in case the recorded signal would be muffled/degraded (Low quality), make sure to check that you are currently using the "Standard" Voice Isolation setting.
This menu is located on the OS top bar right corner as showed below (and only displayed when opening an Audio Recording application and selecting USB microphone or audio interface):
e.g with Ableton LIVE:
Notes:
- Of course, Audio Interfaces requires to be also selected as the Audio Input and Output device within your application (DAW or Audio Recording & Playback software) Audio Settings menu as explained in their dedicated manuals available here:
- The same goes for MIDI devices which requires to be selected as the MIDI Input device inside your application (Virtual Instrument or DAW/MIDI & VST Host software) as explained in the manual:
Device ports detection issues on Windows 11
Since the release of Windows 11 24H2 and 25H2 major updates for Windows 11, a new MIDI Service was introduced and may possibly prevent correct communication from our devices with MIDI applications.
As an exemple, such may lead to the following "Failed to open the device" error message when trying to open the MIDI Control Center.
- In case the device would be identified via the Windows Device manager but device ports not available or displayed via applications, make sure to refer to the following steps which should help sort this out:
-Open the Windows Services Manager by pressing Win + R, typing services.msc, and pressing Enter.
-Locate the "Windows MIDI Service" or "midisrv" in the list.
-Right-click on the service, select "Properties," and ensure the startup type is set to "Automatic".
If already set to “Automatic”, try to disable and enable the service back again before testing the device again.
Finally, if such is not helping, make sure to also go to this page:
https://microsoft.github.io/MIDI/get-latest/
-Then, click on “Download for Intel/AMD x64 Processors” to download the needed tool,
-Execute the midifixreg utility provided in the tools folder and reboot the computer,
-Now Start a Command Prompt in Administrator mode and type in: midifixreg
-Once done, unplug your devices, reboot the computer, plug devices back again and give it another try.
Dedicated Driver install & re-install
Snapdragon processors / Windows ARM compatibility:
-Currently none of our drivers are being compatible with Windows ARM CPU architectures such as Qualcomm Snapdragon and attempting installing them will lead to the following error: "The Current system is not supported".
-Please note also that even our software can possibly work fine (Utilities / Instruments & FXs) on such kind of CPU architectures that such may rely on the Windows compatibility tools and that none of these are being tested nor validated preventing us to guarantee them to operate flawlessly.
- Required Utility & Driver:
If your device is not part of the “Class Compliant” device list in the next accordion, it may require a dedicated driver to ensure its proper installation and operation.
In this case, the re-installation of its associated utility (containing the driver) to force another driver reinstall should help resolving these kind of issues.
Best Practice
To avoid any potential issues, best is to prefer unplugging USB device before installing the driver and only then to plug your device back again.
Of course, once installed, it’s always a good practice to check via the Windows "Device Manager" to confirm that no exclamation mark appears on the device (If so, this could mean that the driver was either not installed, is corrupted, that Windows registry may not be able to associate the device ID to the required driver or that the device may be defective if USB cables and ports were excluded as a potential cause of troubles).
- Here are the required Utilities depending on the device:
MiniFuse products require the MiniFuse Control Center to be installed.
AudioFuse products require the AudioFuse Control Center to be installed.
PolyBrute and Polybrute 12 require PolyBrute Connect to be installed.
MicroFreak / MiniLab3 / KeyLab Essential MK3 / KeyLab MK3 require the Midi Control Center to be installed.
- All these utilities should be available on the following page:
- You will also find below the location of the different drivers (Once properly installed along with the utility) if you wish to attempt to reinstall it manually (a double-click on the executable should suffice):
- USB Midi driver location for MicroFreak / MiniLab 3 / KeyLab Essential MK3 / KeyLab MK3 & PolyBrute:
C:\Program Files\Arturia\USBMidiDriver
- ASIO Audio driver for MiniFuse:
C:\Program Files\Arturia\MiniFuseAudioDriver
- ASIO Audio driver for AudioFuse:
C:\Program Files\Arturia\AudioFuseAudioDriver
Note:
If no driver is being located in the folders above, make sure to first reinstall once again the corresponding utility mentioned above.
- Driver reinstall:
Once reinstalled, if the device is still not working fine along with your software (Standalone application / DAW etc..) it may be worth to attempt manually deleting the currently installed driver (if any) from the Windows “Device Manager” by:
1/ Right clicking on the device and choosing “Uninstall Device”
2/ Ticking the “Delete the driver software for this device” option and then on “Uninstall” button
3/ Restarting your computer, proceeding with another Driver reinstall and from there plugging your device back again on your computer
- Driver install errors / failures:
If install fails with a message such as "Setup wizard ended up prematurely because of an error", make sure to refer to the following suggestions:
-Try to install the driver or the Utility containing the driver (such as MIDI Control Center which installs the MIDI Driver or the AudioFuse Control Center which installs the ASIO driver) with a right-click and by choosing "Run as an administrator".
-Install all the available updates (even optional ones) for Windows, then restart your computer and try again.
-Also, try to unplug all of your current USB devices (apart from your computer mouse and keyboard) before attempting another install of the driver.
If needed, you can download the individual driver installer via the links below:
Finally, if any problem persists, make sure to:
- Try to disable Windows “Fast Boot” option which sometimes lead to potential detection issues
- Check also for any available driver updates for your Desktop computer motherboard from the Manufacturer website or on the Laptop manufacturer website depending on your situation.
- Try to create a “New administrator session” (with all privileges) through the “Control Panel” on your computer to also confirm if the same issue is occurring there or not.
Device Communication
In some situations, the device may be detected properly on OS side but communication with applications may be blocked for or not working as expected depending on some specific OS or devices settings:
- Midi Controllers:
Make sure to refer to the following article to understand what could prevent MIDI devices to operate as expected depending on the situation:
Common MIDI issues - Troubleshoot
- Audio Interfaces:
Windows can prevent Audio Interfaces inputs to be usable with your DAW / Recording software, so make sure to check the following:
- Microphone Access:
You should find an important option via Windows "Privacy & Security" menu, if not enabled and allowed for the desired application, no Audio signal coming from any Audio devices (USB microphones but also any USB Audio devices/interfaces) will be reaching your Audio Tracks preventing any recordings to be done.
Make sure to refer to the following article explained the steps to follow in detail depending on your version of Windows (10 & 11 only):
Turn on App permissions for your microphone
Notes:
- Of course, Audio Interfaces requires to be also selected as the Audio Input and Output device within your application (DAW or Audio Recording & Playback software) Audio Settings menu as explained in their dedicated manuals available here:
- The same goes for MIDI devices which requires to be selected as the MIDI Input device inside your application (Virtual Instrument or DAW/MIDI & VST Host software) as explained in the manual:
Some devices can be considered as Class Compliant "Plug & Play".
USB Class compliant devices won't require any specific driver to be installed to operate properly as they rely on Windows embedded "Plug & Play" drivers to operate properly.
Class Compliant devices restrictions on Windows
"Plug & Play" devices on Windows are currently Mono-Client as the generic driver won't allow them to communicate simultaneously with multiple applications at once.
Make sure to always use them with a single application at a time. When encountering issues with a specific application, make sure to first close all applications before opening the application you would like using your device with.
- Please find first a list below of our “Class Compliant” devices:
Midi controllers:
- Analog Experience “The Player” / “The Factory” / “The Laboratory”
- Spark CDM “Creative Drum Machine” & SparkLe
- MicroLab
- MiniLab MKI / MKII
- KeyLab MKI / MKII
- KeyLab Essential MKI
Sequencers:
- BeatStep & BeatStep Pro
- KeyStep
Analog Drum Machines:
- DrumBrute
- DrumBrute Impact
Hardware Synthesizers:
- Origin “Desktop” & “Keyboard” Digital Synth
- MicroBrute Analog Synth
- MiniBrute / MiniBrute 2 & 2S Analog Synth
- MatrixBrute Analog Synth
These devices if properly detected should be always listed through:
- On Mac OS:
Audio Midi Setup -> Midi Studio menu:
- On Windows:
Device Manager:
On Mac OS:
Make sure to attempt creating a new configuration as explained in the above “Mac OS” section to confirm if this helps.
On Windows:
If any device is not displayed or displayed with an “Exclamation mark” through the “Device Manager” this means that something is preventing it to be properly identified / installed but attempting first to just delete it with a right-click and plug it back again may be worth a try.
Altered generic “Class Compliant” driver (Windows)
- If working fine on another computer this means that the unit should not be the cause of these issues and that such may be related to an issue with the Generic driver.
These issues may in some situations (if nothing else helps) require to proceed with OS repairs or possibly a clean reinstall of the OS as repairing such problems can be sometimes really time consuming and quite complex.
If nothing helps, detection or communication issues may possibly indicate an issue related to the following causes:
If the issue is specific to your current setup:
BACKWARD COMPATIBILITY

Not all USB 3.0/3.1 ports and computers can achieve this USB 2.0 backward compatibility properly. This could be a problem that causes your device to not be visible.
If so:
- Using a Powered USB 2.0 hub, or adding a PCI express USB 2.0 card on a desktop computer may possibly help.
- Disabling the “xHCI controller” in your system BIOS/EFI may also help forcing the USB 3.0 to operate in USB 2.0 mode.
-
Checking the laptop or desktop motherboard manufacturer website for any BIOS/EFI update may be also useful.
If the issue is happening on any computers:
Defective board or USB Connector
- You can try to gently wobble the cable plug on device side to check if such allows the unit to be identified to confirm any potential fault with the USB connector itself (partially soldered or defective).
- If this still persists a fault with the board itself or a completely unsoldered connector can be the culprit.
Note:
After checking all the above aspects, if the detection issue seem to come from the hardware itself, make sure to reach out to our Technical support team to get some help.