

MiniFuse 2 OTG is able to receive and forward datas from both "OTG" & "Computer" USB ports and both USB ports can be plugged at the same time:
- "OTG" port on a Tablet or Smartphone
- "Computer" port on a desktop computer or a laptop
Such allows to listen from each sources distinctively by ensuring selecting the correct "USB Source" as described in the section below and to forward signal from one source to another as described in the next section.
Make sure to refer to these sections to understand how such is working and to be careful about the mentioned aspects to avoid facing any problems.
Make sure to use the dedicated "USB Source" button on the front panel of the interface to switch from one source to another, "OTG" (Smartphones or Tablets) or "Computer".
- If the "USB Source" led is lit on, this means that "OTG" source is being currently selected:
- This setting can be also adjusted via MiniFuse Control Center as well with the following button:
If you would like to record physical Analog inputs on your Tablet or Smartphone via your preferred recording software please read the following information carefully:
- Make sure to only use the "Computer" port as a power source for the signal reaching the Analog inputs to be usable on iOS or Android as a recording source.
- Considering that MiniFuse 2 OTG is Bus powered and that only the "Computer" port is being designed to receive power, you will have to make sure to plug a USB power adapter or a Power bank on the "Computer" port to power the unit:
- Once done, as long as some signal is being received on the Analog Inputs and as long as Inputs 1 or 2 is being selected as recording source the signal should be the recorded as expected on the Audio track:
e.g with Cubasis LE:
- Make sure not to forget to Arm Record the audio track you would like recording signal to:
If you would like to forward signal from your Phone or Tablet to your computer (or vice-versa), refer to the following steps:
- Make sure to first plug both USB ports accordingly:
"OTG" port on a Tablet or Smartphone
"Computer" port on a desktop computer or a laptop
On Computers' side, make sure to:
- Select Channels 3/4 as the output on your Audio Track if you would like to forward signal to your Phone or Tablet.
- Select Channels 3/4 as the input on your Audio Track if you would like to record signal from your Phone or Tablet.
On Phone or Tablets' side, you should not have to worry to much about such considering that only Channels 1/2 are available. All signals will be received or forwarded via Channels 1/2.
 For Windows users
On Windows, MiniFuse Control Center offers a dedicated Mixer allowing you to merge all your different sources to send it to the OTG port.
You may have set the input Gain too high, resulting in overloaded signal.
- Pay close attention to the input meters on the unit or in the MiniFuse Control Center application when setting your levels:
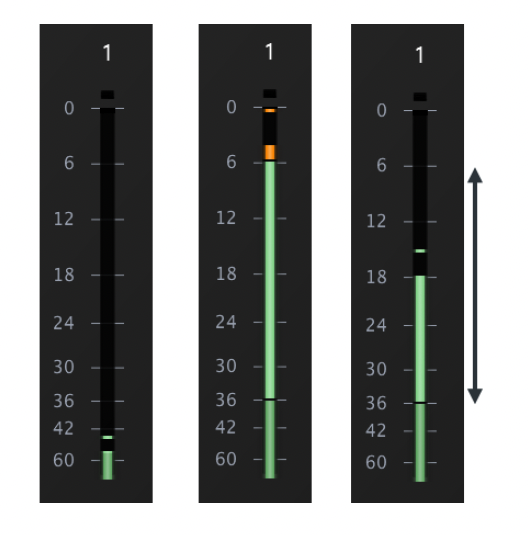
Generally you want to give yourself enough "headroom" to ensure that loud parts of the performance do not overload the input.
- A common technique when setting Gain is to sing or play the loudest that you think you would during the performance, and set the Gain such that there is still plenty of room before the signal overloads or "clips".
-
If monitoring the signal through the MFCC, you can use the high-resolution meter to aid with setting gain:
The light green area of the meter, from -36dB to -6dB, is the optimal range we recommend for capturing a good signal without clipping.
There are software applications that may help minimize the clipping, but generally we recommend that you re-record the performance at a lower Input gain.
Alternatively, you can apply more distortion as a creative effect to mask the clipping.
There are several things to check if you're unable to record into your DAW:
- Did you set the corresponding input to correct mode "Line or Instrument" and enabled the 48V for phantom power if needed?
- Is the Gain knob turned up so that you see activity on the meters on the MiniFuse 2 OTG or inside the MiniFuse Control Center software?
- Is your recording application configured to use the MiniFuse 2 OTG for audio input and your Audio track set up for the correct input to be used for recording?
e.g with Ableton LIVE:
Ableton LIVE - Recording Audio
- Did you ensure that "Microphone access" permission was granted for the recording application?
For iOS:
Control access to hardware features on iPhone
For Android:
How to Turn On the Microphone on an Android Phone
For macOS:
Control access to the microphone on Mac
For Windows:
This delay is typically called latency.
Depending on the scenario and needs, you should find some useful suggestions below:
Suggestion 1
-In your application, go to the audio settings and choose a smaller buffer size.
e.g with Ableton LIVE:
Open "Settings" -> "Audio" menu:
Doing so will decrease the latency at the expense of higher CPU usage.
-To learn more about latency and how to deal with it make sure to refer to this useful guide:
Suggestion 2
-To monitor your inputs before or during recording, try to use the Direct Monitoring feature of the MiniFuse 2 OTG.
-To do so, turn the Monitor Mix control in the counter-clockwise direction:
This will allow you to hear the input directly through the outputs.
Suggestion 3
-If available in your DAW, you can temporarily switch off Automatic Latency Compensation (also sometimes known as Automatic Delay Compensation, or Low Latency Mode).
This feature is used by the DAW to compensate for latency introduced by some plugins.
-You can refer to this interesting guide:
Understanding plug-in delay compensation
Of course, make sure to turn it back on once finished recording.
You are probably hearing both the direct input signal, and the same signal going through your software.
To remedy this you can either:
- Mute that track in your application while recording, then turn it back on when finished recording,
- If you don't need to hear any computer audio, turn the Monitor Mix knob all the way to the left
When using the Loopback feature, audio from your computer is routed virtually to inputs 5 & 6 on the MiniFuse 2 OTG.
In your application, ensure that these inputs are active and that the recording track is set to use them.
The user manual covers the Loopback feature in more detail.